P A I N T I N G T H E T A L E

Artist-In-Residence
Pacesetter Art Therapy
Each month a new project is designed to, first and foremost, bring out a smile! Smiles are the very best form of therapy. Secondly, to come up with an idea that seems like magic. Usually, that in itself, will bring out a smile. There is nothing that creates new neural pathways better than curiosity.
My challenge is to take an idea, that interests me, then transform it into a simple activity. I try to incorporate an intellectual element into the activity, usually in it’s design. I also try to interject a fun, artistic element to bring out each client’s creative side.
I devote quite a bit of time and thought to the activity’s development. I walk through every aspect of the hour long project, analyzing any stumbling blocks I may find along the way. I rethink that particular step and iron out any obstacles.
I want each client to move freely through the activity. There will always be areas where clients will need help so I make sure I can be by their side if these occasions arise.
Each activity starts with an enthusiastic hello and a big smile. The first few minutes of the hour is devoted to a simple discussion about the particular topic. If, for instance, the activity is felting, we would discuss how sheep are sheared and how wool is prepared and dyed. How agitation locks the fibers together and any new vocabulary, like felting.
I try to come up with the most thought provoking activity I can. I want each client to feel that I value their intelligence and really appreciate any time and attention they spend sharing the activity I have prepared for the group. That said; I want to introduce the participants to good quality materials, when ever possible. Quality materials usually produce quality results. That makes for a happy, satisfied client and a very happy resident artist!
When designing each project, I try to keep in mind the abilities of the group. I try to find the project challenging enough to keep their interest, yet not to the point of the client becoming discouraged. I do want the client to feel like it was their creation. This is a challenge with such a variety of disabilities. Each center has between 5 and 16 clients at any given time so I have to be prepared to accommodate as many as would like to join in the activity.
In researching programs for the disabled, I am puzzled as to exactly why, where and when art therapy finds its way into a program. It seems to be geared towards process, connecting emotion with material. There seems to be a gap between using no art therapy for vocational purposes and art therapy as a tool for helping with mental/emotional disorders.
If art therapy works, why is it lacking so in the overall programs for the disabled.
My concerns are with product and marketing the work. I worked with a local vocational training center years ago helping the clients set up a screen printing area. It never entered my mind that it was considered ‘institution like’. I found only positive enthusiasm about their facility and a drive to turn out great prints.
In working with clients, I do have ‘salable art’ in the back of my mind. The challenge is in coming up with a desirable piece of art for marketing i.e. framing, etc. then finding a venue for selling it.
I realize funding is an issue. I feel that if I could ever get the product and venue established, the work would sell itself. Having a location that we could promote as a ‘go to’ for hand made gifts and an easy way to support the disabled, would be so great.
I don’t expect every activity to produce a salable work of art. I have come to realize, some clients are very possessive and others can hardly wait to gift it over.
I will find a comfortable balance between the two somehow. All activities don’t have to be product related, some months I want the clients to just have fun. Just the sheer joy of doing it!
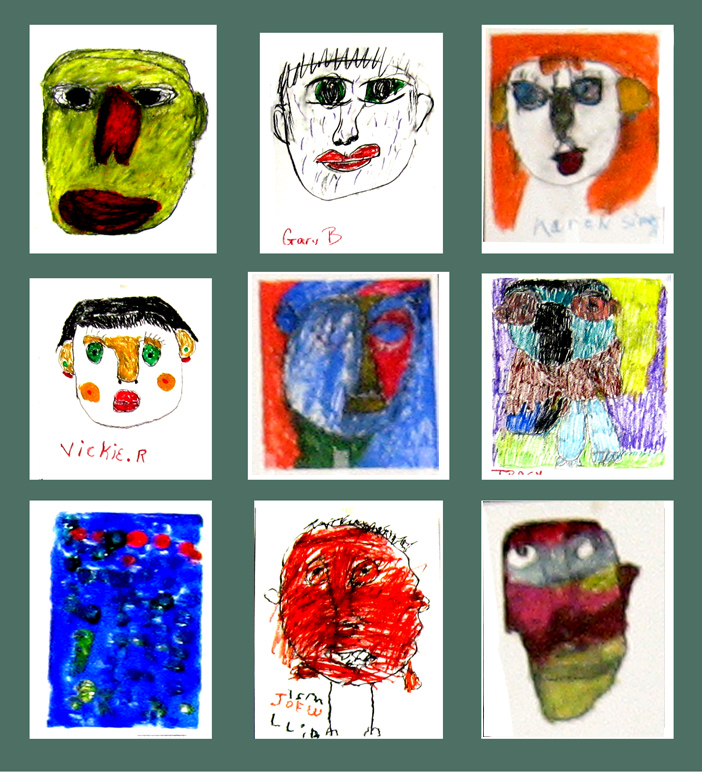
Work Created in April's Self-portrait Project
PACESETTER ART THERAPY
April Program - Self-portraits
This first activity coved self awareness, an appreciation of who we are as unique individuals. We discussed facial features and where each falls on the face. Each client pointed out the differences between their own features and their neighbor’s features. We studied and discussed the different shapes of our own eyes, nose and mouth plus, sizes and spaces between each feature.
We also covered a little art history by discussing examples of famous artist’s own self-portraits. Several handouts showed works in pin and ink, oil paints and oil pastels.
This project gave me the opportunity to examine the talent and ability of each client. This This will help me develop projects with a better fit.
MATERIALS:
1. Table easel - 18x24 inches with paper slipped underneath a thick paper frame with taped edges to keep boarder clean.
2. Mirror (with stand)- to easily find facial features.
3. Self-adhesive dots - an easy way to find eyes first.
4. Charcoal pencil - (a bit messy, changed to oil pastels)
PROCEDURE:
1. Set up table easels with white paper slipped underneath a heavy paper frame with taped edges to keep boarder clean.
2. Handed out oil pastels and examples of self-portraits by famous artists.
3. Set up mirrors so each client could easily study their faces.
4. A self-adhesive dot was placed in the spot, on the paper, where the eyes would be drawn.
5. Each client traced around each dot then the dots were removed.
6. Eyes were drawn into the eye area.
7. Lines were drawn down from the inside corners of the eyes to where the rostral shapes were formed.
8. Lips were drawn just under the nose.
9. A chin was added which gave the line for adding the sides of the face. Hair and ears were then added.
10. Clients were encouraged to color in areas to give their work more depth.
11. Backgrounds were added up to the tape line that held the matte frame in place.
12. Each frame was then lifted up and the finished artwork was pulled away from underneath the frame revealing a nice clean boarder.
13. CLOSURE Clients were encouraged to display their self-portraits. Topics of discussion included emotions and how the faces change with each emotion. Hair styles and how it frames the face. Eye colors and how many have blue or brown eyes.
GOALS:
- To explore non-verbal expression/communication.
- To produce the client’s own visual representation of themselves.
- To involve clients in positive group experience.
- To provide an opportunity for positive support for the client and encourage them to focus on his or her unique features.
- To isolate parts from the whole then the new whole from the pats.
- To explore self identify in a safe environment.
- To involve the clients in a task-oriented process involving decision making.
- To follow directions, planning a layout for features and completing the work.
- To develop trust and willingness to relate.
POPULATION:
The self-portrait project could be used with most population.
EVALUATION:
I found this project highly successful for this group of clients with disabilities. All responded very positively to the activity.
Finding the eyes first and working down from there seemed to create a sense of confidence. They were encouraged to continue by seeing it come together so easily. Most participants produced a fairly realistic work. I think this activity is a great self-esteem builder.

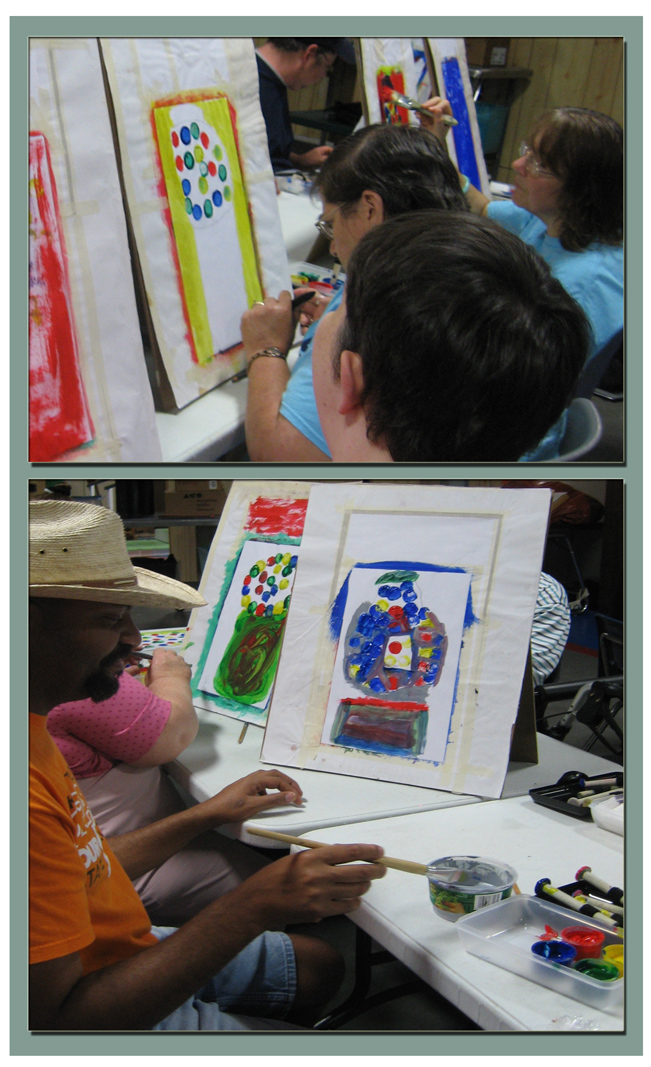
Work Created in May's Color Project

PACESETTER ART THERAPY
May Program - Color
May’s project focused on color, composition, shape and form. A gum ball machine was used for the shape and form. The gum balls were the perfect examples for color. Since color is the main objective, mixing color is a perfect starting point. We discussed the 3 primary colors, then asked what color was when yellow and blue were mixed. I actually heard the correct answer! Red and yellow was a bit more difficult. No one could even guess what color came from mixing blue and red.
At that point I sep the easel and began mixing the 3 colors right there on the easel. Laying down a blotch of each primary color and dragging each into the other creating the secondary colors. The clients seemed quite impressed!
MATERIALS:
- Table easel - 18x24 inch with white paper slipped underneath thick paper frame to create a clean boarder.
- Acrylic paint - Individual closing paint boxes were built to hold 4 different colors.
- Tool with round pad - for ease of creating gum balls, round 3/4 inch felt pad were hot glued to a short dowel rod to create a handle for a tool.
- Brushes - 1/2 inch paint brushes to add color to gum ball machine and fill in background.
- Water and paper towels - for clean up.
PROCEEDURE:
- Set up table easels with white paper slid underneath a heavy paper frame to keep the boarders clean.
- Clients situate easels so they could easily see the gum ball machine.
- Luckily the gum ball machine’s glass dome just about filled the top half of the paper and the machine, the bottom half.
- Each client found center line pretty easily and drew the shape of the dome in the top half of the paper.
- The dome shape was then filled with different colors of balls using the round felt tool. Each tool was either wiped to change colors or used by a neighbor who might need that color.
- Half inch paint brushes were used to paint the metal gum ball machine on the bottom half.
- Colored backgrounds were added up to the tape to give each painting a nice sharp boarder.
- The heavy weight paper was lifted and the art work was gently lifted away from the tape to give a nice clean surface.
- CLOSURE Clients were encouraged to display their work. Topics for discussion included who likes bubble gum, When was the last time you enjoyed a piece, what color was it.
GOALS:
- To build perception skills
- To expose clients to art concepts like line, shape, color.
- To build self-concepts by process of production. Product then becomes a visual representation of the process.
- To create a group atmosphere where members share an experience.
- To provide an opportunity for the client ventilate energy and anxiety through the physical activity of producing art.
- To encourage and reinforce each client’s creative and imaginative expressions.
- To build hand-eye coordination, small motor and cognitive skills.
- To develop trust and a willingness to relate.
- To encourage projection of self and how they may feel about themselves and their environmen
POPULATION:
Our color project could be used in most populations.
EVALUATION:
This activity is especially good for building large and small motor coordination. I found it especially good for introducing art elements; color, composition, form. I also noticed the gum ball image was pleasing subject matter and created a comfort zone for the clients to enter the activity. Over all I feel this was a successful activity.

Work Created in June's Felting Project

PACESETTERS ART THERAPY
June Program - Felting
After extensive research on felting, I came up with a simple system that would make it easy for the clients to create a nice well-worked piece of felt.
I wanted to find an interesting, tactile activity that would be fun, smart and beautiful. Felting seemed to fit all the categories. The fibers actually bind together from the combination of hot water, soap, and agitation. The soap foam was exciting to work with. The enzymes, from the soap, work well to lock the wool fibers together and change the pH factor.
MATERIALS:
1. 6x6inch square colored background wool felted piece.
2. Colored strips to decorate the felt squares.
3. Agitator built from PVC and curlers.
4. Styrofoam board, chamois and nylon cover.
5. Squeeze bottle filled with bar soap grated and diluted with water.
6. Coffee pot to heat water.
7. Towels to squeeze out excess water.
8. Chamois for absorbing excess water.
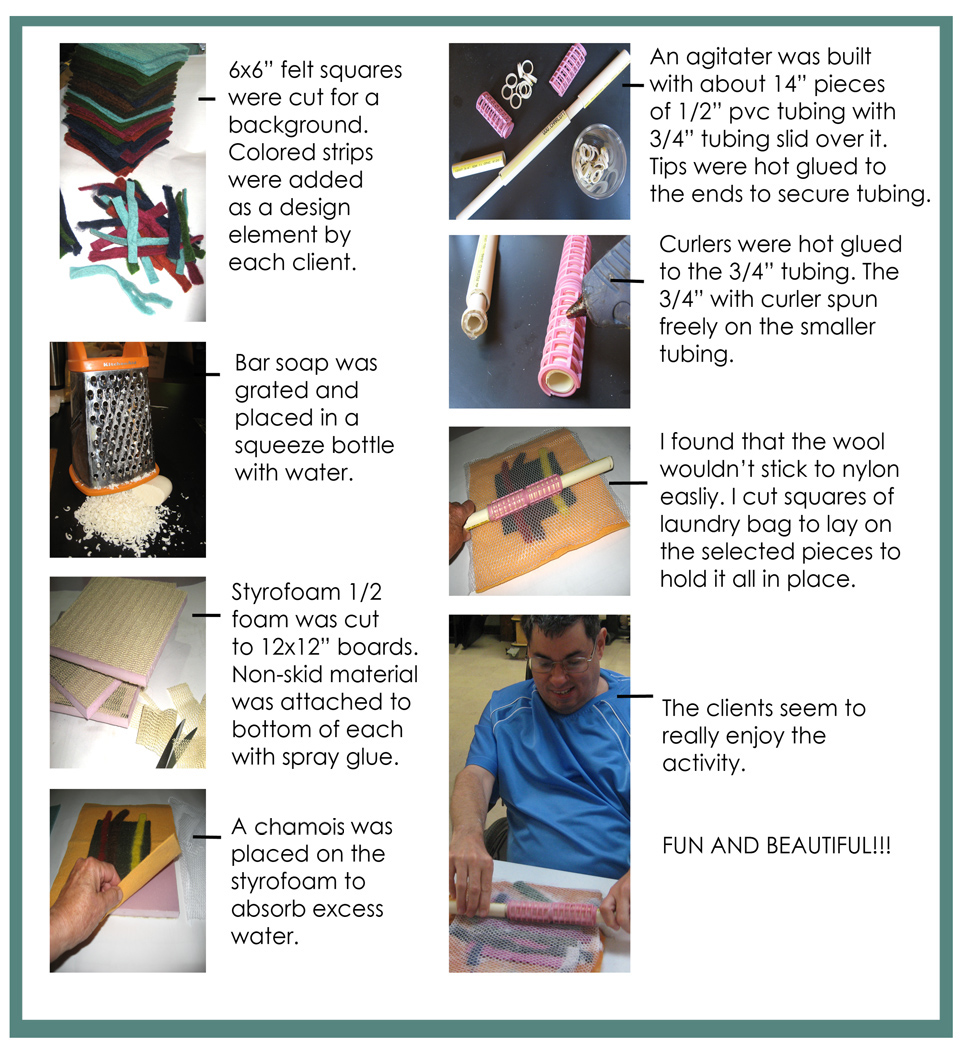
PROCEDURE:
1. Fill coffee pot with water, no coffee, push start
2. Talked about the felting and showed examples.
3. Handed out Styrofoam boards and chamois.
4. Passed around a box filled with a variety of colored 6x6 inch squares and colored strips to lay on their background piece.
5. After each client arranged their strips on their background piece, the nylon netting was laid over each felt selection.
6. Hot water was poured over each stack of felt pieces then soap was squirted onto the hot water.
7. The first agitation was done with hands till it created enough suds to use the agitator.
8. Each client moved the agitator back and forth counting to twenty then turning the felted pieces, counting again.
9. After 4 to 6 turns the nylon netting was lifted just enough to see if the felting was complete.
10. Each client tried to lift the strips from the background. If separation was easy, the netting was replaced and agitation continued.
11. When felting was complete, each felted piece was rinsed and dried as much as possible.
12. CLOSURE Each client wrote their names on a piece of tape and laid it on top of their work. The felted pieces were collected up to mount and frame. I plan to display the art either at the centers or for exhibitions.
GOALS:
- To explore the tactile element of felting.
- To enjoy the feel of the soap suds through the clients fingers.
- To involve the clients in task oriented process and
- follow directions.
- To involve clients in a positive group experience.
- To develop trust and willingness to relate.
POPULATION:
The felting project could be used in most population.
Very little help was needed.
EVALUATION:
Fun, had to be the best word for this activity. All responded very positively to the felting project. Clients seemed very happy and proud of their felted work of art. The difficulty came in trying to collect the felted pieces for displaying at a later date. A few clients became very attached to their felted pieces.

Work Created in the July's Paper Making Project

PACESETTERS ART THERAPY
July Program - Paper Making
Paper making had to be our next activity since, IT’S FREE! I noticed at least one center running documents through a shredder. I asked if I could possibly use a bag or two to build a project for the clients. I was told that I could have all the shredded paper I wanted. YES! I started researching different ways of making hand made paper.
The client were happy and surprised that they had contributed to the project.
We discussed what was in paper pulp from cellulose to rag. We also discussed new vocabulary like deckle and pulp. I grew up in an area where there were a number of paper mills and they smelled so nasty but the product is beautiful.
MATERIALS:
1. Deckle - how each was built on next page
2. Tub - to hold undyed paper pulp
3. Undyed paper pulp - to create sheets
4. Dyed paper pulp - 8 different colors
5. Freezer paper - cut in 12x18” pieces
6. Styrofoam boards - to transfer freshly made paper on
7. Picks and spoons - to lift colored pulp to decorate paper piece
8. Towels - to absorb excess water
9. Chamois - to absorb excess water


PROCEEDURE:
- Showed examples of hand made paper and discussed how paper is made.
- Styrofoam plates were placed on the table with a variety of colored paper pulp on each.
- Picks and spoons were placed on the plates for easy decoration.
- Styrofoam boards and freezer paper sheets were given out to transfer their paper onto.
- Each client took the deckle, with my help, slid the deckle underneath the watery pulp lifting it up filling the frame with wet pulp.
- After the deckle drained a bit, the client lifted the frame open, leaving the pulp standing on the screen.
- The client’s sheet of freezer paper was placed on the sheet of pulp with the Styrofoam on top of the paper.
- Together we grabbed the sides of the stack and flipping the whole thing over so the paper pulp was left laying on top of the freezer paper.
- The client, with my help, lifted the deckle away from the fresh, wet, delicate paper pulp leaving it on the freezer paper.
- Each client took their freshly made paper back to their work space to add colored pulp and create a personal work of art.
- Each hand made paper art piece was squeezed a bit to remove excess water and placed in a safe place to dry.
- CLOSURE: Ideas for other paper projects were discussed. Other activities that we could work in might be a great greeting card project. Maybe even a 3-D project. The idea that the pulp was provided by the centers makes the paper project very exciting.
GOALS:
- To understand by process of production then becomes a visual reproduction of the process.
- To encourage a reinforce client’s creative and imaginative expression.
- To develop trust and willingness to interact in a cooperative effort.
- To involve client in a positive group experience.
- To develop large and small motor skills.
- To expose client to a method of relaxation by reducing stress through an expressive and creative physical activity.
POPULATION:
This paper making project would be an exciting activity for most individuals and small groups. Clients in wheelchairs may have a problem filling the deckle but designing and creating the colorful paper sheets should be easy and fun.
EVALUATION:
I previously thought most clients would be able to use the deckle. I realized, after the first center, I needed to rethink the deckle scooping part. Each client needed one on one help with that portion of the activity. I ended up only using 1 deckle for the whole group. After experience using the deckle, another paper making activity might go more smoothly.

Pacesetters Art Therapy
August Program - Exploring Motion

This particular activity covered so many cognitive and motor skills!
First was the mental capacity to understand things in progression or sequential placement; first, second, third. The zoetrope was designed with eight frames. Each image changing slightly to create movement. Most clients understood the concept of blending the eight image into the first, creating a continuous loop. A jumping frog was placed in their newly constructed zoetrope as an example for creating their own images in motion, aware of small changes in each image.
Second was the ability to follow directions for building the framework of the zoetrope. Simple instructions but going through the steps beforehand did make the completed piece easier to understand.
Third was the ability to spin the zoetrope in a consistent, even motion. This was the most difficult part of the activity, to keep the movement continuing for the amount of time it took to actually enjoy the visual activity of the image.
MATERIALS:
- Strips of black poster board cut to 4 inches by 28 inches. 8 slits were cut into each strip about 1/4 in wide and about 1 inch from the bottom.
- Styrofoam dinner plates - 8 1/2 inches with hole in bottom of each.
- Plastic cups - 8 oz with hole in bottom of each.
- Scotch tape - for connecting edges.
- Paper fasteners - fasteners were pushed through the holes pulling cup and plate together.
- Copy paper strips containing images cut to fit into each zoetrope.
- Copy paper strips with no images for creating their own moving images.
- Felt tip markers - for each client to create their zoetrope strip.
PROCEDURE:
- Discuss images in progression film strips, etc. Show examples of flip book. Show the example of the frog jumping.
- Go through the process of assembling the zoetrope. Lay plate on table with paper fastener up through the hole, put cup on fastener and open the paper fastener holding the 2 parts together. Tape the black poster board strip ends together. Place circle of black poster board on plate and tape down.
- Tape the ends of the frog jumping strips together and drop it in the zoetrope.
- Hand out bland strips and markers for each client to create their own strip of moving images.
- Each client was encouraged to hold and spin their zoetrope. A few had difficulty holding and spinning with a continuous motion.
- It took a few tries before all participants got the hang of it!
- CLOSURE: Since a variety of motor skills were involved, clients were anxious to be active and move about sharing each others creation.
GOALS
- To encourage light hearted, creative, moving ideas.
- To share my love for the depth of the experience with the clients.
- To help the clients explore their own ideas for moving images.
- To promote depth of thought about the zoetrope concept.
- To help clients with any motor skills that they may have difficulty with.
POPULATION
The zoetrope project can be used with most populations.
EVALUATION
I found this project very successful for developing motor skills in particular. The desire to want to spin their zoetrope was stronger than the challenge of their particular physical disability.
I was surprised to see the confidence each client showed in trying to create their own strip. The clients seem to be very proud of their zoetropes.

PACESETTERS ART THERAPY
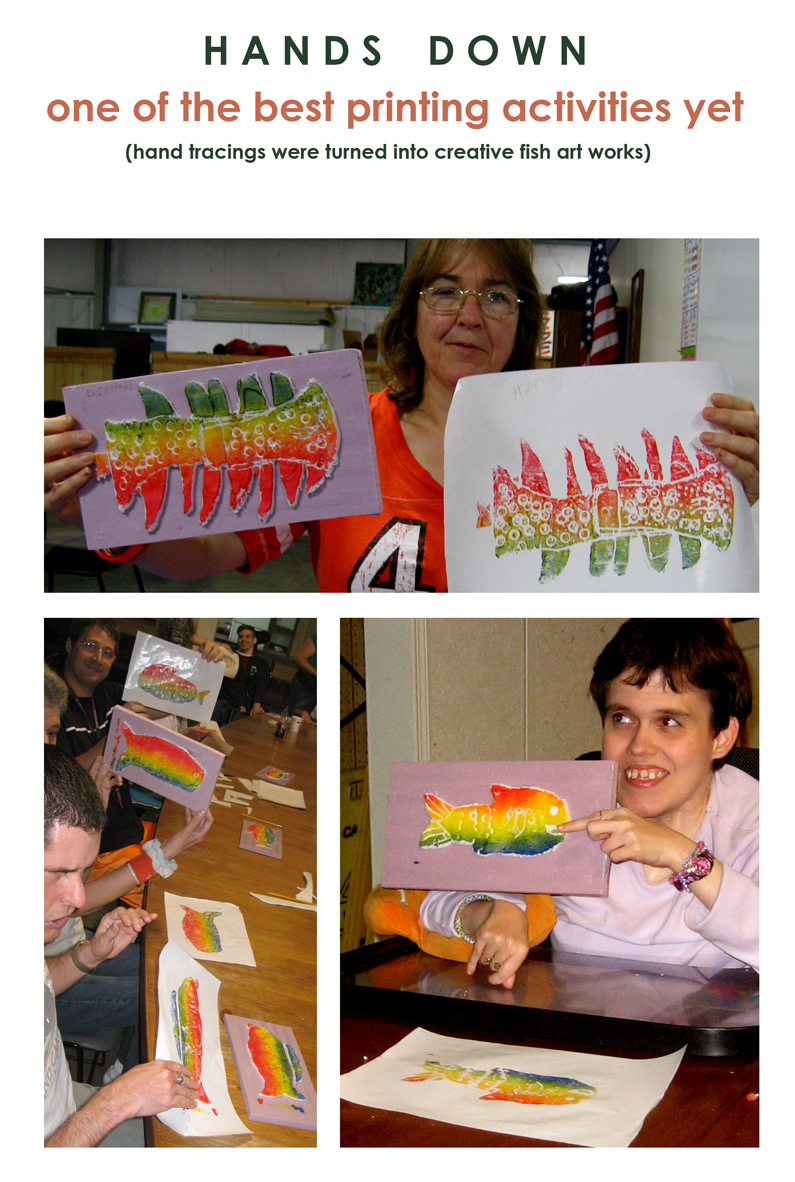
September Program - Fish Prints
I found all the clients eager to get started. To make this activity successful, I had to come up with a clever start. Easy starts makes for an easy activity. Tracing their hand is easy!! I found I could strip the paper from both sides of 'cheap' poster board from Dollar Tree. It left a pristine sheet of white styrofoam.
BUT! as eager as they were, we had to take some time with vocabulary.
While holding up the inked example, I explained the printing process. How a handmade printing plate is made, prints are usually created with ink. The ink is applied with a brayer. The most important thing about a printing plate is that many prints can be made with the one plate!
With all that now covered. They placed their hand on the sheet of styrofoam and traced it with a common number 2 pencil. Going over the line once or twice would create a groove deep enough to easily break their hand shape from the back ground. Kind of looks like a fish.
The fish shapes were then placed on a 6x10x1/2 inch piece of pink styrofoam. Other parts were also placed around the edges to create fins and other fish parts. Textures were created with a pencil, copper tubing pieces and felt tip marker caps.
Each creative plate was inked with the three primary colors. This gave me another chance to review the color mixing process. Blue on top, yellow in the middle and red on the bottom created a nice blend. Each color ran into the other just enough to create green and orange.
Most clients were able and eager to apply the ink to the plate, lay the paper over the inked plate rub it gently and lift the fresh print!
MATERIALS:
- Styrofoam board - cheap! Dollar Tree - paper removed from both sides.
- Styrofoam sheets - 4x8x1/2 inch cut to 6x10 inch pieces for printing plate.
- Double stick tape - 6 strips are enough to cover the 6x10x1/2 inch styrofoam to attach fish parts.
- Pencils - Number 2 for tracing hands and creating detail for fish texture.
- Acrylic paint - 3 primary colors ( used as ink for braying on printing plates)
- Freezer paper - cut into 8x12 inch sheets for pulling prints. Shiny side to plate.
- Brayer
PROCEDURE:
- Discuss the printing procedure and vocabulary used in the trade. Cover tools; plate, brayer, ink, print.
- Review color mixing.
- Have clients trace their hands onto the thin white styrofoam sheets.
- Clients trace over the line creating a grove deep enough to break the hand shape from the background.
- Each shape is placed on a 1/2 piece of styrofoam covered with double stick tape. Other parts and pieces are added to create fins and extra fish parts.
- Texture is given to the surface of the fish using small tubes, marker caps and pencils.
- Blue, yellow and red ink is squirted then brayed till the colors are even and blended nicely on a piece of pink styrofoam.
- Ink is evenly transferred to each fish plate.
- The shiny side of freezer paper is placed over the freshly inked fish plate and lightly pressed by each client.
- The paper is carefully lifted away to reveal the colorful fish print.
- CLOSURE: This activity was jam packed with stimuli from large thin objects, small thin objects, large thick objects, fine detail lines, adhesives, arrange elements one to another always keeping the shape of a fish in mind.
GOALS:
- To experience the unique application of a print or transfer.
- To review primary and secondary colors.
- To incorporate a simple motor skill activity.
- To give each client the opportunity to follow simple instruction.
- To offer an opportunity to accomplish a goal.
- To learn about images in reverse
- To feel proud of the art they created.
- To develop trust and the willingness to explore their creative side in a safe environment.
POPULATION:
The fish print activity could be a rewarding experience in most any group of clients.
EVALUATION:
I found the fish print activity highly successful in all five of the disabled groups I presented it to. The first group had difficulty with spray adhesive sticking to their fingers so I went from that to double stick tape. Having anywhere from 2 to 16 clients participating in any activity, it is difficult to determine what materials will work best. Even though the double sided tape worked great, I had no way to stack the styrofoam boards on each other without them sticking together. I tried medium weight plastic over the boards but it stuck and pulled the double side tape away from the printing plates. Time did not allow me to put the tape on during the activity. I do plan to work this kink out before my next printing project. All other parts worked out great. Timing for the hour project worked out nicely. I tried to have each client who were able, apply ink to their plate, but time did not alloy be to continue with all clients.
Pacesetters Art Therapy
October Program - Printing
JACK-O-LANTERN
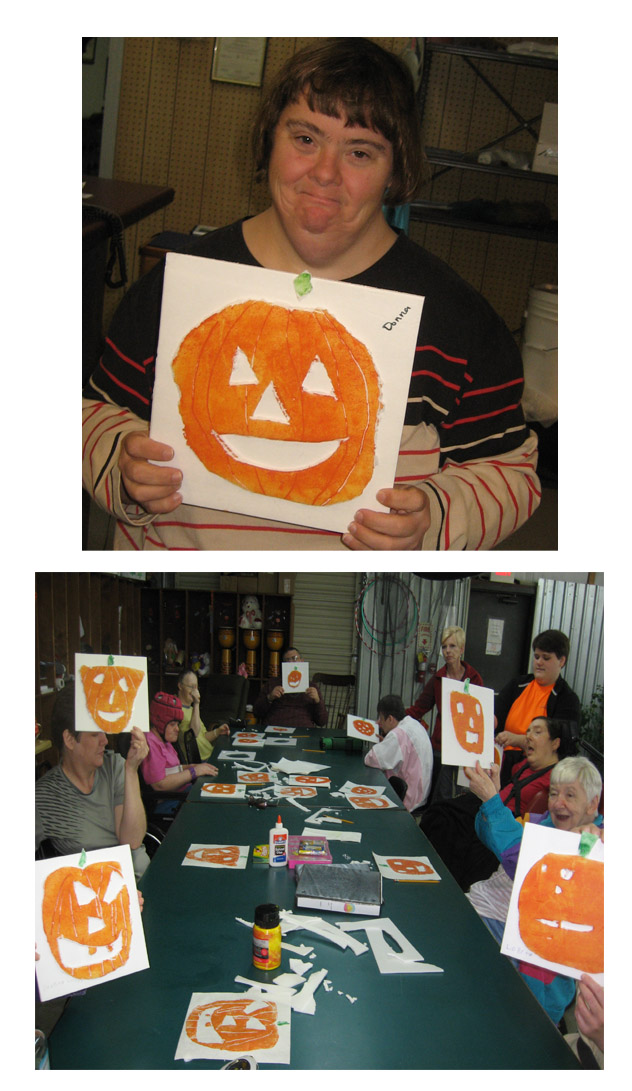
Having just finished a printing activity for September, the clients knew the process pretty well. The large pumpkin shapes varied greatly and facial features were quickly understood but breaking them out seemed a bit challenging. They had to trace over the pencil lines two or three times to be able to punch the styrofoam piece out cleanly.
I don't usually work a season into an art activity but this was a perfect time to use their creative abilities to decorate their homes and the centers.
Materials:
- Styrofoam board - cheap! Dollar Tree - paper removed from both sides.
- Styrofoam board cut to 18x18 inch squares for mounting their large Jack-O-Lantern faces.
- Pencils to trace lines for detaching parts and adding detail to the pumpkin surface.
- Double stick tape was used to mount the Jack-O-Lantern head and facial parts.
- Paper from stripping the Styrofoam boards was used to print the Jack-O-Lanterns
- Bright orange acrylic paint (used as ink to bray on plate)
- Brayer
Proceedure:
- Discuss the printing procedure and vocabulary used in the trade. Cover tools; plate, brayer, ink, print (really a review from last month)
- Clients were first given the Styrofoam which I previously stripped the paper from both sides.
- Little help was necessary to create the first large pumpkin shape.
- Most understood quickly how the features were arranged on the pumpkin shape.
- The deep groove, made with the pencil. had to be traced over a few times to get the part to actually break out cleanly.
- One or Two strips of double stick tape is all it took to keep the Jack-O-Lantern in place on the larger background Styrofoam while the inking and printing was completed.
- Each Jack-O-Lantern plate was inked.
- Paper was placed over each inked plate, clients patted to make sure ink covered all parts and the paper and any bubbles were worked out. the print was gently lifted to expose the Big Orange Jack-O-Lantern face!
- CLOSURE: I think this activity was very successful because it hit close to heart and home. Everybody loves the idea of a candle in a gourd in late evening. The wonder and magic of Halloween. Big beautiful decorative pumpkins were hung everywhere.
Goals:
- To experience the unique application of a print or transfer.
- To learn about images in reverse
- To incorporate a simple motor skill activities.
- To give each client the opportunity to follow simple instruction.
- To offer an opportunity to accomplish a goal.
- To feel proud of the art they created.
- To develop trust and the willingness to explore their creative side in a safe environment.
POPULATION:
Most participants would be able to finish this activity with little or no help. Inking their own individual plate might be an issue since the surface area was very large and took more than one squirt of ink from the bottle to print the Jack-O-Lantern.
Evaluation:
Everyone seemed to love the activity. Jack-O-Lanterns are very well recognized and makes us all smile. I did enjoy working this activity into what was happening around the calendar.
Pacesetters Art Therapy
November Program - Warm Colors
FANTASTIC FALL FOLIAGE


I couldn't resist using this time of year for a fall color activity. Warms! leaves turn such incredibly intense colors from a variety of reds, yellows, oranges, browns. Vibrant pink purples are also part of the landscape. Greens dot the hillside from trees that haven't quite turned yet to cedars and pines. I wanted to add an extra element of interest by having the clients add oil pastel drawings. I tried white paper for the background but found the white was too hard to cover. The brown paper worked well to create a deep forrest look.
Yes, it was another seasonal activity but it was well worth the effort. Most participants love seasonal activities. I may have to work more on seasonal activities... or maybe work both together.
MATERIALS:
- Table easel - 18x24 inch with brown paper slipped underneath thick paper frame to create a clean boarder.
- Acrylic paint - Individual closing paint boxes were built to hold 5 different warm colors.
- Tool with round sponge end - for ease of creating small colorful trees from a distance. Round 3/4 inch piece of sponge pieces were hot glued to a short dowel rod to create a handle for a tool.
- Oil pastels - A full array of oil pastels were spread on the table to create simple, personal fall drawings
- Wax paper - for masking off an area for a creative drawing.
- Masking tape - to hold the wax paper secure.
- Water and paper towels - for clean up.
PROCEEDURE:
- Set up table easels with brown paper slid underneath a heavy paper frame to keep the boarders clean.
- Clients situate easels so they could easily see the sample of the colorful distant hill side.
- A piece of wax paper was ripped to a nice shape and taped in place.
- Each client was given a group of 5 warm colors to chose from.
- The brown paper was filled with warm fall colors small tree shapes were created. The small sponge made it easy to the right size tree. Each tool was either wiped to change colors or used by a neighbor who might need that color.
- The masked are was exposed and clients created a small fall drawing with oil pastels.
- Beautiful hillsides were added right up to the tape to give each painting a nice sharp boarder.
- The heavy weight paper was lifted and the art work was gently lifted away from the tape to give a nice clean surface.
- CLOSURE: Clients were encouraged to display their work. Topics for discussion included warm fall colors, what trees turn what colors, hillside from a distance, masking off an area. Discussed what each client would add in the exposed area.
GOALS:
- To build perception skills
- To expose clients to art concepts like line, shape, color.
- To build self-concepts by process of production. Product then becomes a visual representation of the process.
- To create a group atmosphere where members share an experience.
- To provide an opportunity for the client ventilate energy and anxiety through the physical activity of producing art.
- To encourage and reinforce each client’s creative and imaginative expressions.
- To build hand-eye coordination, small motor and cognitive skills.
- To develop trust and a willingness to relate.
- To encourage projection of self and how they may feel about themselves and their environment.
POPULATION:
Our fall color project could be used in most populations.
EVALUATION:
This activity is especially good for building large and small motor coordination. I found it especially good for introducing art elements; color, composition, form. I also noticed the beautiful fall color was very pleasing subject matter and created a comfort zone for the clients to enter the activity. Over all I feel this was a successful activity.
PACESETTERS ART THERAPY
December Program
HAND MADE PAPER ORNAMENTS WITH GREETING CARDS

I can't resist a seasonal activity since it is on everyone's mind.
